Stylized Customizable Avatar
Introducing stylized customizable avatars. Customize body and face, use various combinations of clothing items to create unique stylized avatars. Included support for Mixamo animations, Viseme Blend Shapes, Blinking, Expressions and much more.
1.0. Demo Scenes
To get a quick overview of this asset pack access demo scenes in Avatars/Scenes folder.
1.1. Editor Scene
This scene contains an avatar with intuitive UI where you can edit avatar customization properties and clothing in play mode.
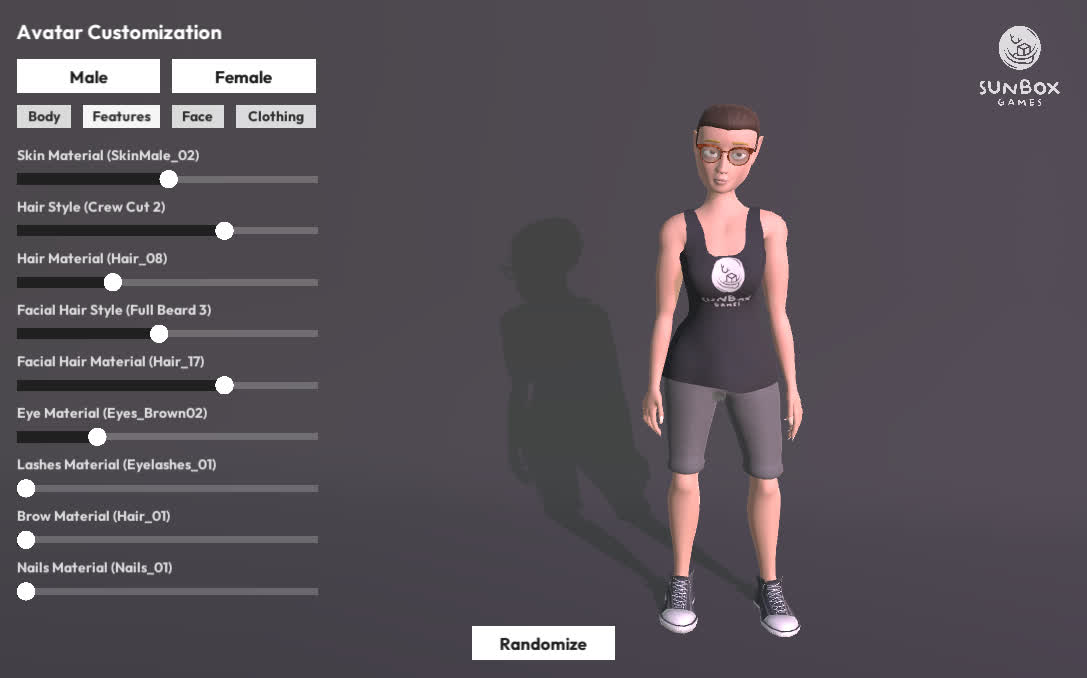
2.0. Avatar Editor Overview
To start editing your avatar drag and drop avatar prefab into scene. Avatar prefab can be found in Prefabs folder.
2.1. Presets
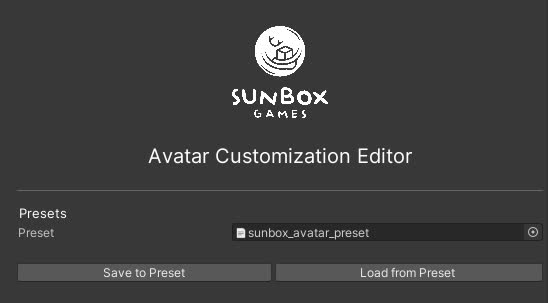
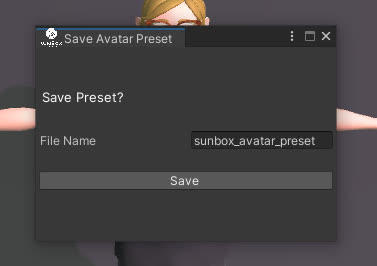
You can save or load any avatar customization configurations as a preset file (.txt file). Some of the presets are already shipped with the asset pack and can be accessed in Avatars/Resources/Presets folder.
To load a preset file, select it from available presets and click on Load from Preset button.
To save configuration into a preset file simply save it as a new preset or override existing one. New presets will be saved in Avatars/Resources/Presets folder.
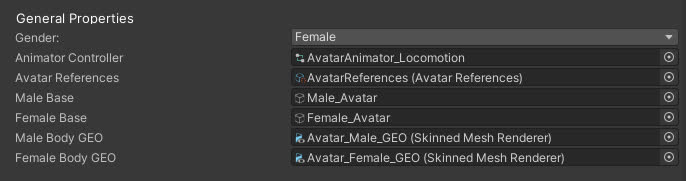
2.2. General Properties
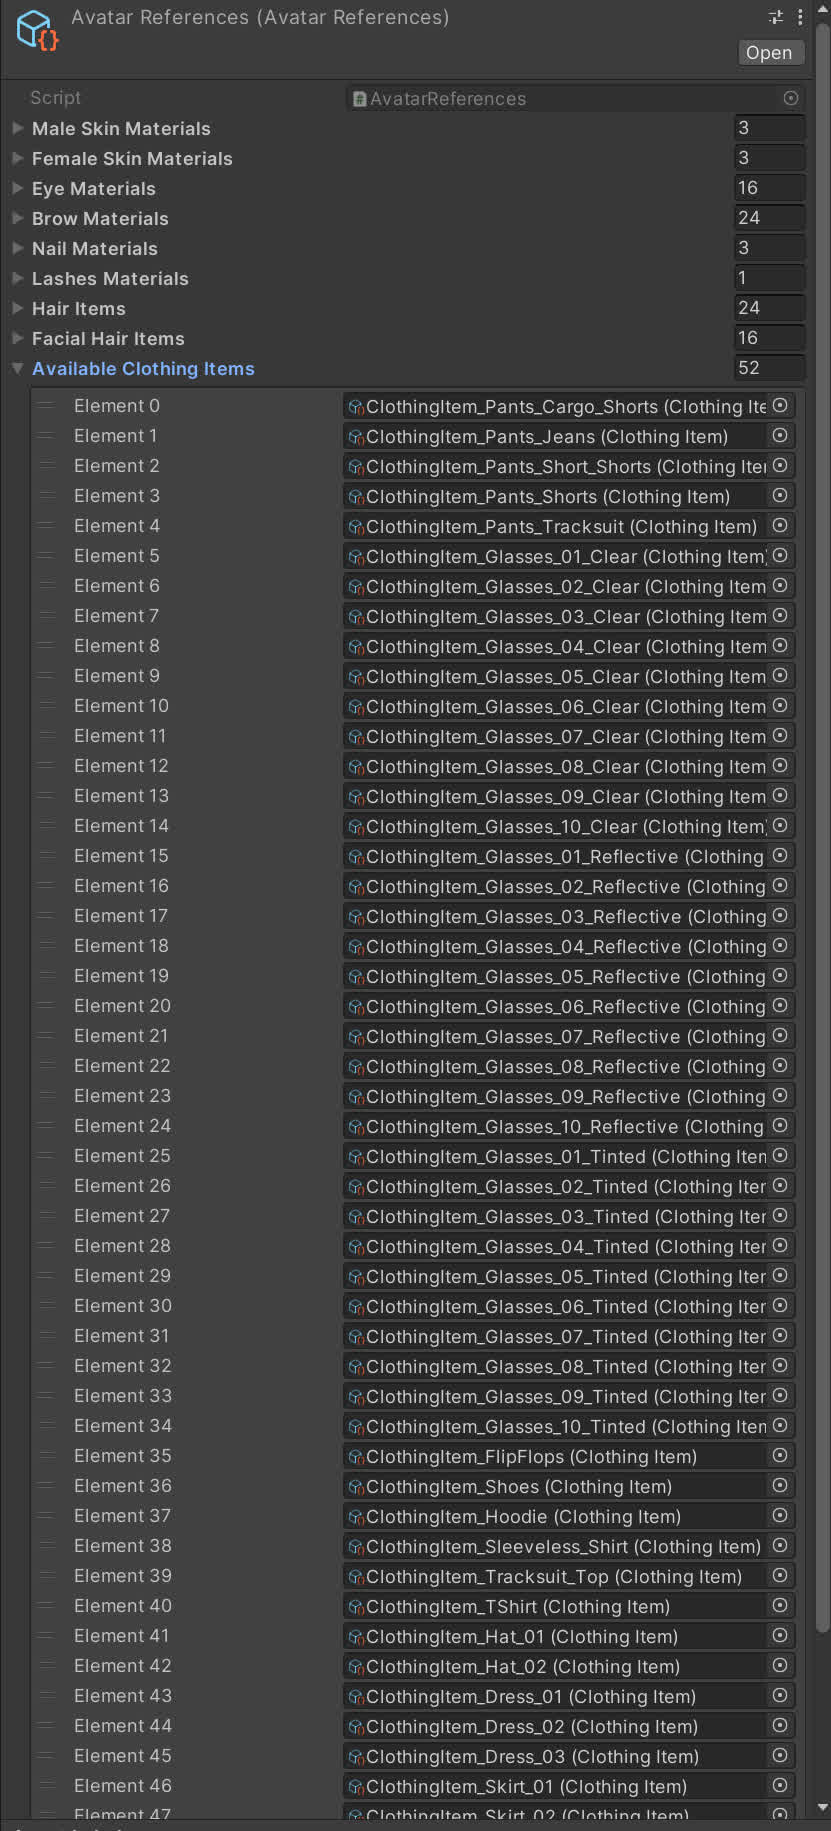
Here you can change avatar gender, access/change runtime animator controller and access the references to base female & male meshes. Here you can find AvatarReferences property which holds all references to different materials, clothing items, facial hair and hair. To add new materials or items access the references scriptable object.
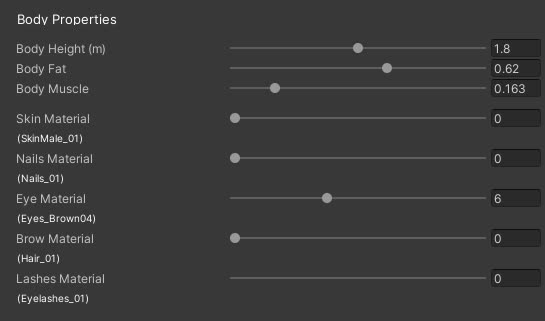
2.3. Body Properties
Here you can change body properties of your avatar such as body height, fat, muscle, skin material, nails material, eye material, eye lashes material and brow materal.
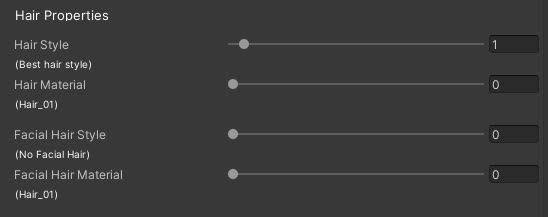
2.4. Hair Properties
Hair and facial hair (male only) properties can be changed here. You can change the style and material for a selected hair and facial hair.
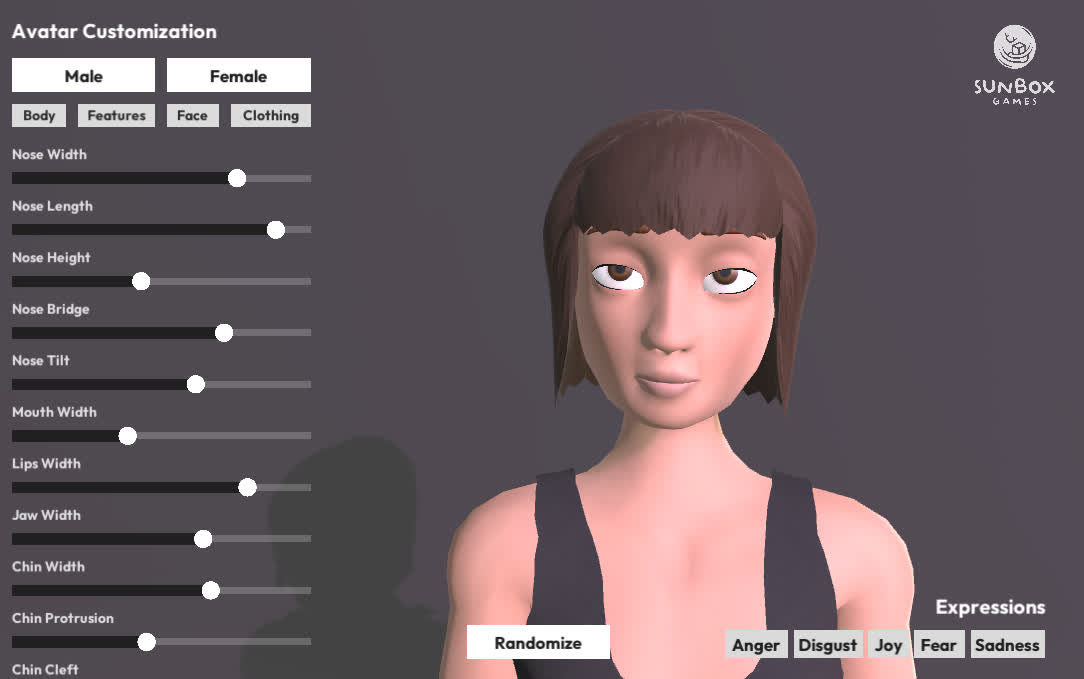
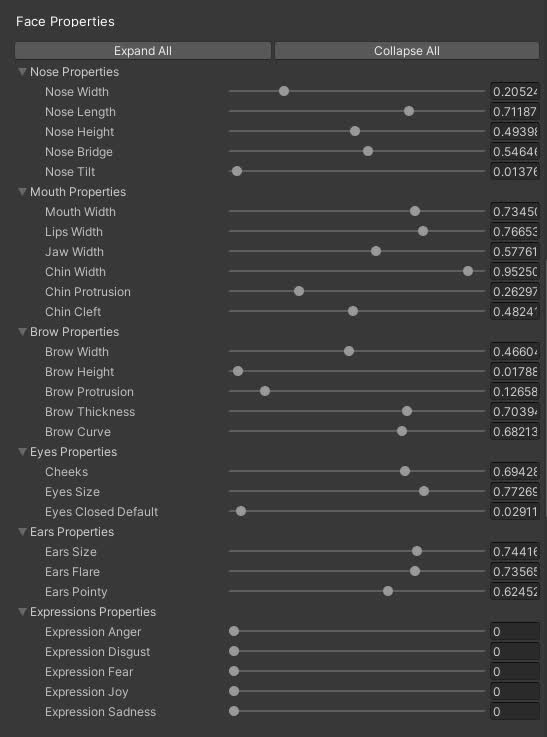
2.5. Face Properties
There are numerious face properties that you can change. Note that expression properties should be 0 if you want to change avatar expressions via API for best results.
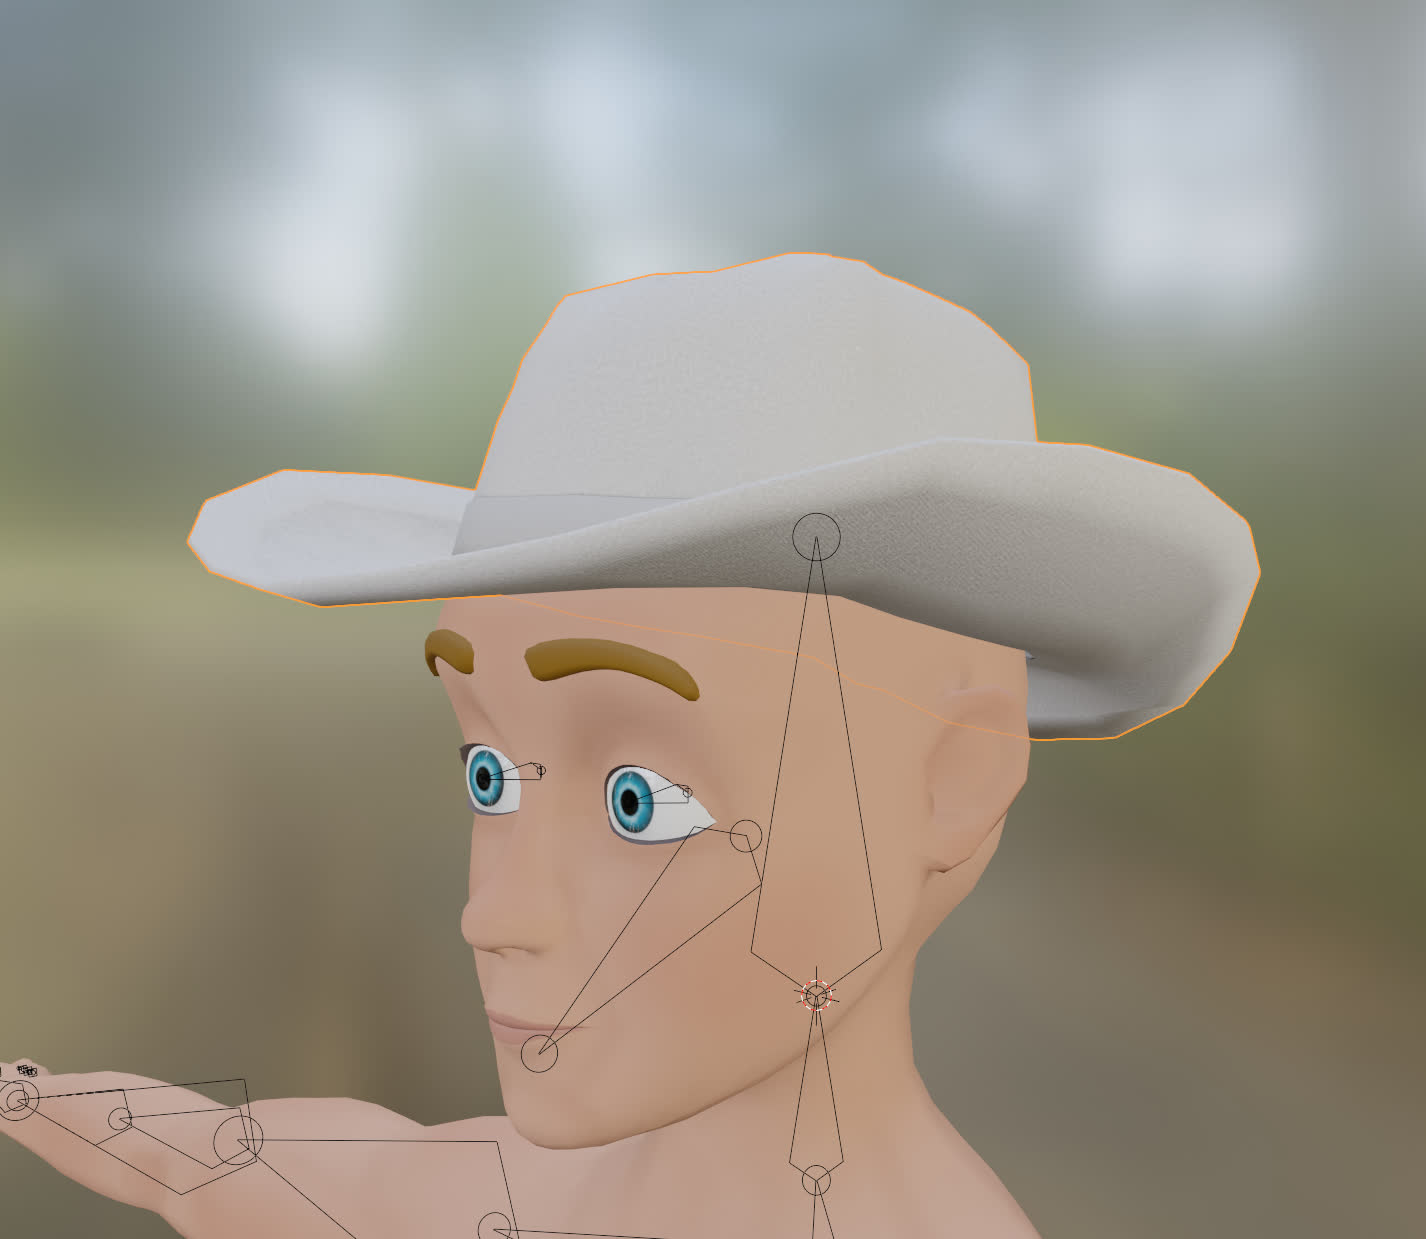
2.6. Clothing Items
You can change 5 different clothing item slots for an avatar: hat, top (body), bottom (pants), glasses and shoes. When you select a clothing item that fits the slot you can then change its variation. Internally this changes the material that is used with the clothing item mesh. You can add more materials if you want to. Check any ClothingItem scriptable object for more.
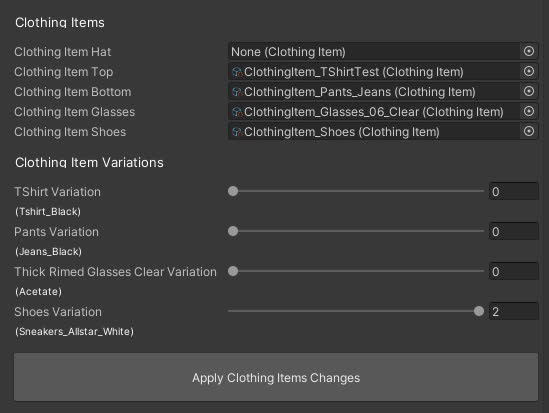
Pressing Apply Clothing Item Changes will remove any duplicates or unused clothing items and will equip missing clothing items with appopriate material variation.
2.7. Other Settings
Here you can set various settings. Edit blinking properties in Play mode so you can instantly see the results. Expression Change Speed is used with Expressions API and controls the expression change when settings it from the script.

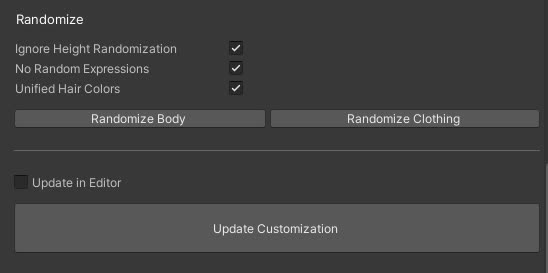
2.8. Randomization and Update
Here you can randomize body properties or clothing. You can also ignore height randomization, ignore random expressions and unify hair colors when using randomization tool.
Checking Update in Editor will update any customization settings while not in play mode.
If Update in Editor is unchecked press Update Customization button to apply any customization changes.
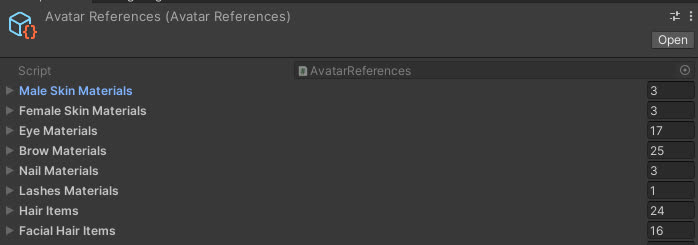
2.9. Avatar References
In AvatarReferences property you can find all references to the materials and items available to the Avatar. You can add your own custom materials to the pool of already available materials (same with clothing items, facial hair and hair). When new items and materials are added then these items can be then used with your Avatar — works out of the box.
3.0. Male and Female Body Meshes
The avatar comes with male and female versions of the body mesh. Changing gender will also switch the clothes to the specific gender version of the clothes piece.
4.0. Customizable Body Shapes
Avatar come with several body shape blend shapes.
You can set the given variables:
- BodyFat (-100 to 100)
- BodyMuscle (0 to 100)
- BreastSize (-100 to 100) will only be applied to female version
- NailsLength (0 to 100)
- NailsCurve (0 to 100)
Updating body shape will also apply the changes to the equipped clothes and shrink the hidden parts of the body mesh to prevent clipping.
5.0. Customizable Face Shapes
Avatar comes with a lot of facial customizable shapes.
You can set the given variables:
- NoseWidth (-100 to 100)
- NoseLength (-100 to 100)
- NoseHeight (-100 to 100)
- NoseBridge (-100 to 100)
- NoseTilt (-100 to 100)
- MouthWidth (-100 to 100)
- LipsWidth (-100 to 100)
- Cheeks (-100 to 100)
- BrowWidth (-100 to 100)
- BrowHeight (-100 to 100)
- BrowProtrusion (-100 to 100)
- BrowThickness (-100 to 100)
- BrowCurve (-100 to 100)
- EyesSize (-100 to 100)
- EyesClosedDefault (0 to 100)
- EarsSize (-100 to 100)
- EarsFlare (-100 to 100)
- EarsPointy (0 to 100)
- JawWidth (-100 to 100)
- ChinWidth (-100 to 100)
- ChinProtrusion (-100 to 100)
- ChinCleft (0 to 100)
Changes to face variables will also apply the changes to the facial hair.
6.0. Customizable Expressions
The avatar models come with blend shapes for the 5 basic emotions that can be blended together.
You can set the given variables:
- ExpressionJoy (0 to 100)
- ExpressionAnger (0 to 100)
- ExpressionSadness (0 to 100)
- ExpressionFear (0 to 100)
- ExpressionDisgust (0 to 100)
Changing expression variables will also apply the changes to the facial hair. This will permanently apply expression settings to the player. To apply expression in general use the following method on the avatar instance:
avatar.SetExpression(AvatarCustomization.AvatarExpression.Anger...);
7.0. Blinking
Avatars blink automatically, but you can set some parameters to change it to your liking.
- BlinkingAmount
- BlinkingSpeed
8.0. Viseme Blend Shapes
While the blendshapes are created and available, the implementation of lipsync has to be done by the end user. Do not forget to drive the blend shapes on facial hair as well. Avatar models come with viseme shapes for lip synching and are compatible with https://developer.oculus.com/documentation/unity/audio-ovrlipsync-unity/
Alternatively you can use the simpler approach of just animating the jaw bone. Viseme blend shapes are included in skinned meshes and are named to Oculus Lip Synch standard: Viseme_ AA, Viseme_O, Viseme_CH, etc. If you are using facial hair on avatar make sure to control viseme blend shapes on facial hair meshes as well.
9.0. Scripting
9.1. Spawning an Avatar
You can find an Avatar prefab under Prefabs folder. Place the Avatar prefab reference in your script and then you can spawn your randomized avatar using the following code as an example.
public void SpawnAvatarWithRandomization(int seed) {
        GameObject avatarInstance = Instantiate(AvatarPrefab, Vector3.zero, Quaternion.identity);

        AvatarCustomization avatar = avatarInstance.GetComponent<AvatarCustomization>();
        avatar.RandomizeBodyParameters(
            seed: seed,
            ignoreHeight: true,
            unifiedHairColors: true,
            noRandomExpressions: true
        );
        avatar.RandomizeClothing(
            seed: seed
        );
}
You can procedurally spawn your avatar using a seed → same seed with same settings will generate the same avatar. You can also choose different options when randomizing body parameters:
- ignoreHeight: ignores height when randomizing it, it will default to 1.8m,
- unifiedHairColors: facial hair, hair and eye brow colors will be the same if set to true,
- noRandomExpressions: expression parameters will be set to 0 so they will not effect any face randomizations
9.2. Individual Settings
You can change individual settings via scripting like this:
public void SpawnAvatarIndividualSettings(Vector3 position) {
  GameObject avatarInstance = Instantiate(AvatarPrefab, position, Quaternion.identity);

  AvatarCustomization avatar = avatarInstance.GetComponent<AvatarCustomization>();
  avatar.BodyHeight = 1.6f;
  avatar.NoseBridge = 50f;
  avatar.BodyMuscle = 100f;
  avatar.UpdateCustomization();

    // set the gender
    avatar.SetGender(Gender.Male);
}
Make sure to check the source code to see the limits of each option in attributes, an example:
[AvatarFloatFieldAttribute("Nose Height", "noseHeight", -100, 100, Section = SECTION_FACE_PARAMETERS)]
public float NoseHeight = 0f;
Example: NoseHeight can go from -100 to 100, any values that exceed these numbers may cause glitches on the avatar itself.
9.3. Load from Text Asset/Preset file
You can load a preset from a string or a text asset as such:
public void SpawnAvatarFromPreset(TextAsset asset, Vector3 position) {
    GameObject avatarInstance = Instantiate(AvatarPrefab, position, Quaternion.identity);

    AvatarCustomization avatar = avatarInstance.GetComponent<AvatarCustomization>();
    AvatarCustomization.ApplyConfigFile(asset, avatar);
}
You can also store avatar configuration into a string with:
GameObject avatarInstance = Instantiate(AvatarPrefab, position, Quaternion.identity);
AvatarCustomization avatar = avatarInstance.GetComponent<AvatarCustomization>();
string configurationString = AvatarCustomization.ToConfigString(avatar);
9.4. Change Clothing Item on Avatar
public ClothingItem GlassesClothingItem;

public void SpawnAvatarClothingOptions(Vector3 position) {
    GameObject avatarInstance = Instantiate(AvatarPrefab, position, Quaternion.identity);

    AvatarCustomization avatar = avatarInstance.GetComponent<AvatarCustomization>();
    avatar.AttachClothingItem(
        item: GlassesClothingItem,
        variationIndex: 1
    );
}
9.5. Update any Avatar Changes
There are two main methods that you can use to update the customization or apply any clothing item changes. If you only tweak avatar values e.g. face or body settings use this method:
avatar.UpdateCustomization();
If you have changed any clothing items use this method to apply the changes:
avatar.UpdateClothing();
9.6. Expressions API
You can set avatar expression like this:
AvatarCustomization avatar = avatarInstance.GetComponent<AvatarCustomization>();
avatar.SetExpression(AvatarCustomization.AvatarExpression.Anger);

// you can combine expressions
avatar.SetExpression(AvatarCustomization.AvatarExpression.Sadness | AvatarCustomization.AvatarExpression.Anger);

// reset with
avatar.SetExpression(AvatarCustomization.AvatarExpression.None);
10.0. Animations
The avatars are made to be compatible with Mixamo and other Unity Humanoid animations. As they are, the avatars do not use root motion, so make sure to download the animations with “In Place” checked.
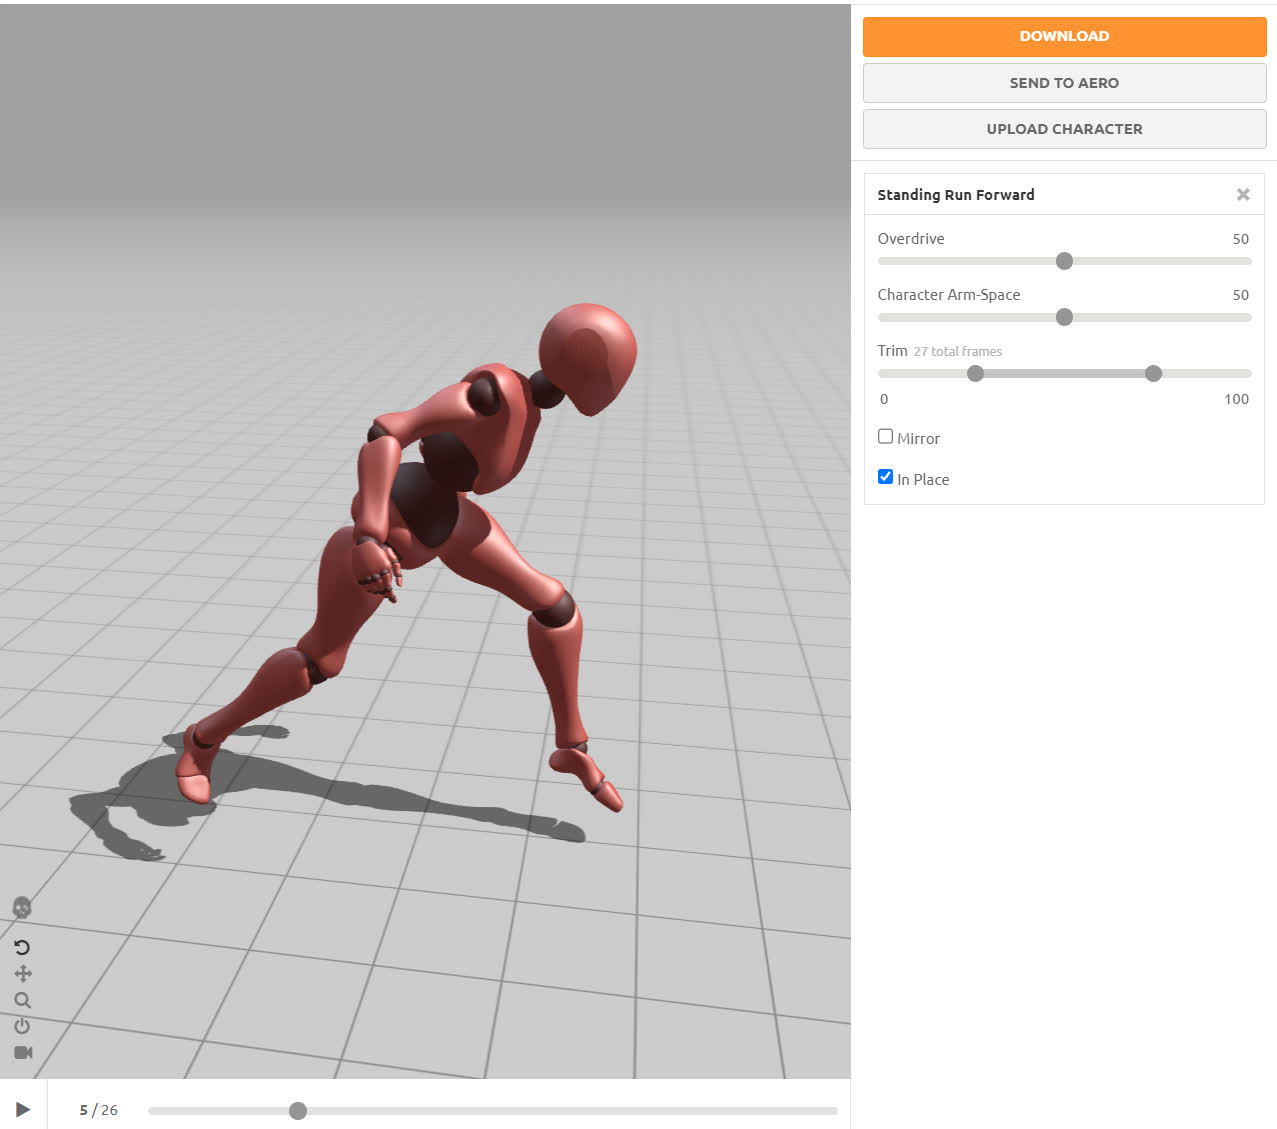
Download as FBX For Unity, the rest is mostly up to your preference.
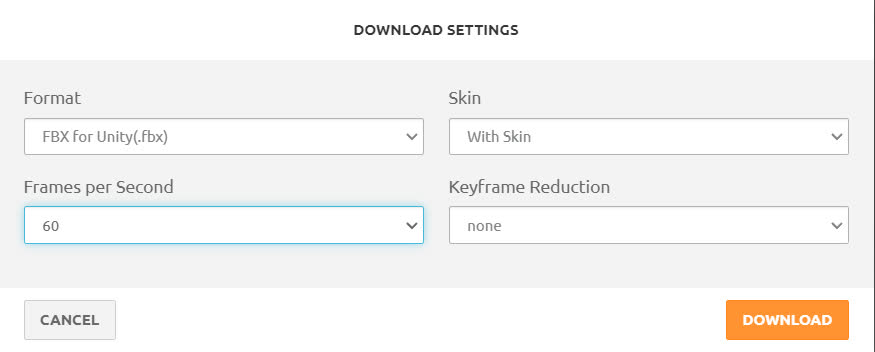
When importing, you can use the existing xbotAvatar from Mixamo.
When importing animations that use root bone animation, make sure to check the “Bake Into Pose” option for it to work correctly, since root motion is disabled on the avatars.
11.0. Create Custom Clothing Items
All clothing items have a male and female versions which share materials.
11.1. Skinned Mesh Renderer Clothes
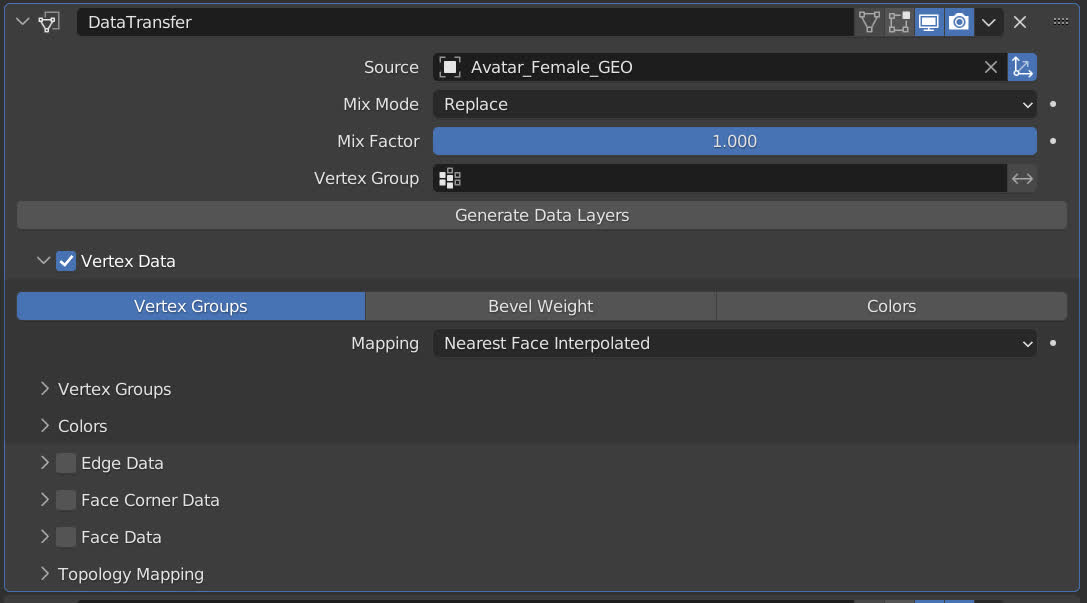
When creating clothes for the avatar system that will be deformed by the skeleton, you need to make sure that everything that is needed for the system is there. The clothes need to be weight painted to work with the giver character model
This is usually done easiest with Blender’s Data Transfer modifier. We have so far had best results with these settings:
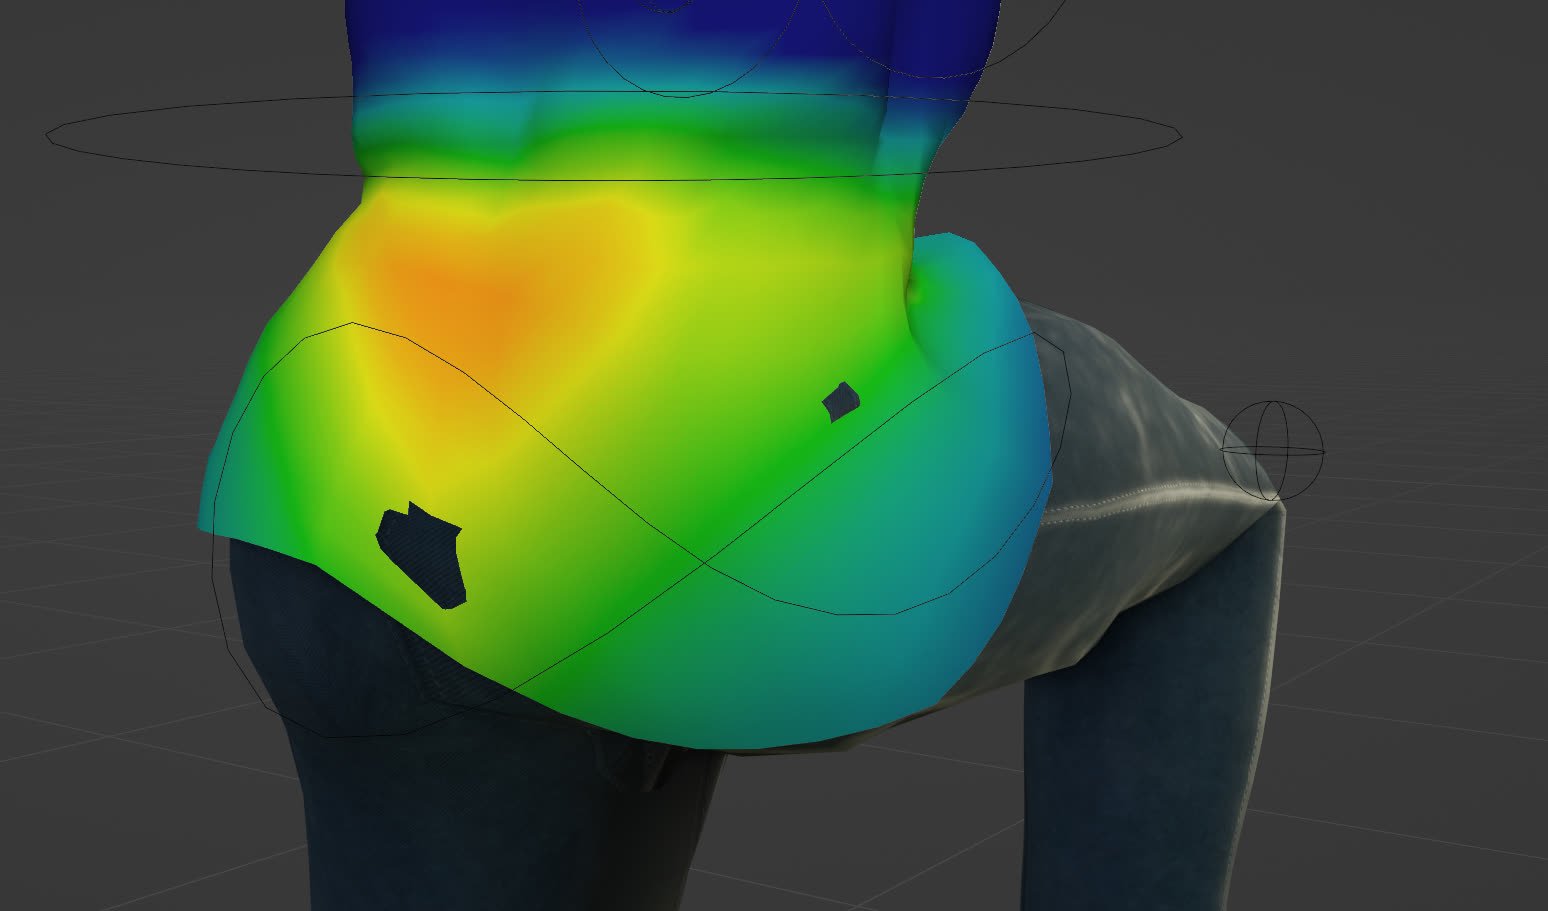
This however will not give you a perfect weight paint, so some manual adjustment is necessary. Run the avatar through some poses to see how it deforms and also check how it works with other clothes that will appear with that clothing piece.
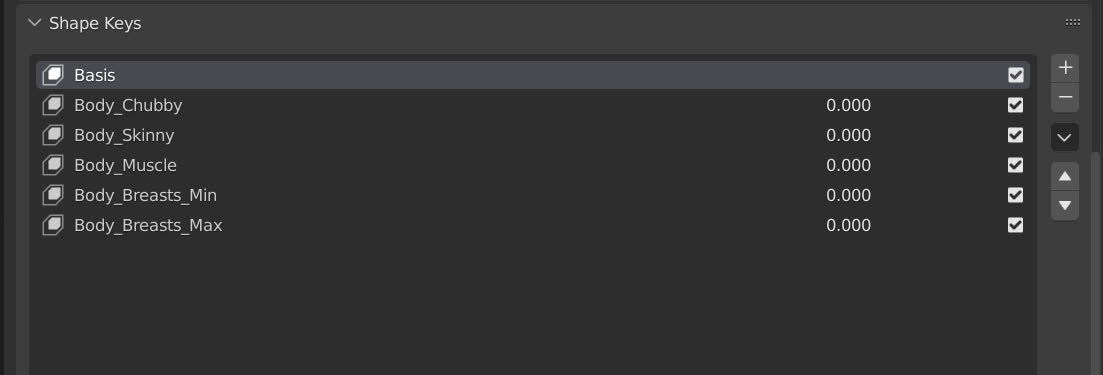
After you are satisfied with how your clothing piece moves with the character you will need to create the 5 blend shapes (shape keys in Blender) that are required for different body types. All Clothing items that use the skeleton need all 5 in this exact order. If the models will just be parented to a specific bone and don’t need to use a skinned mesh renderer that isn’t necessary (eg. hats, glasses),
Turn the individual shapes to 1 on the character and other existing clothes and remodel your clothes piece to fit the body shape and go well with other clothes. This usually easiest to do with proportional editing.
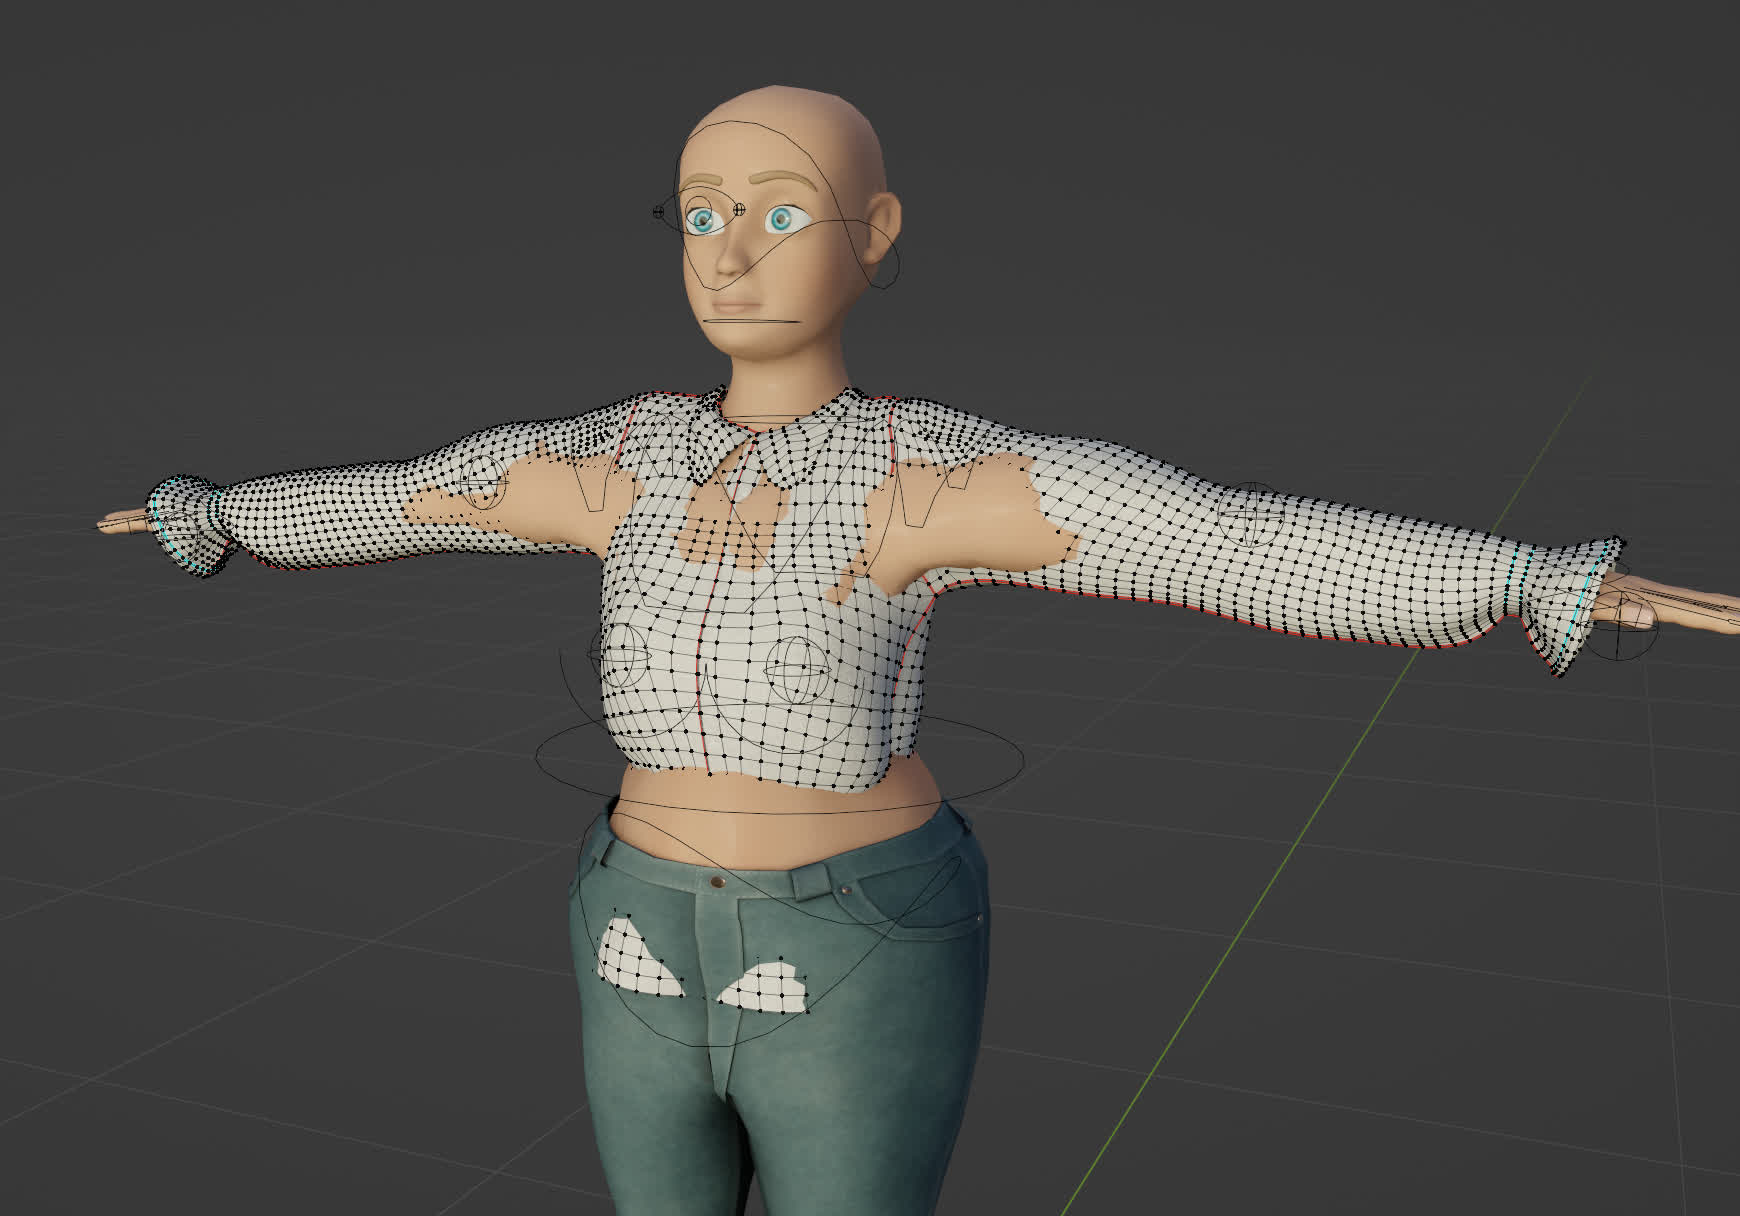
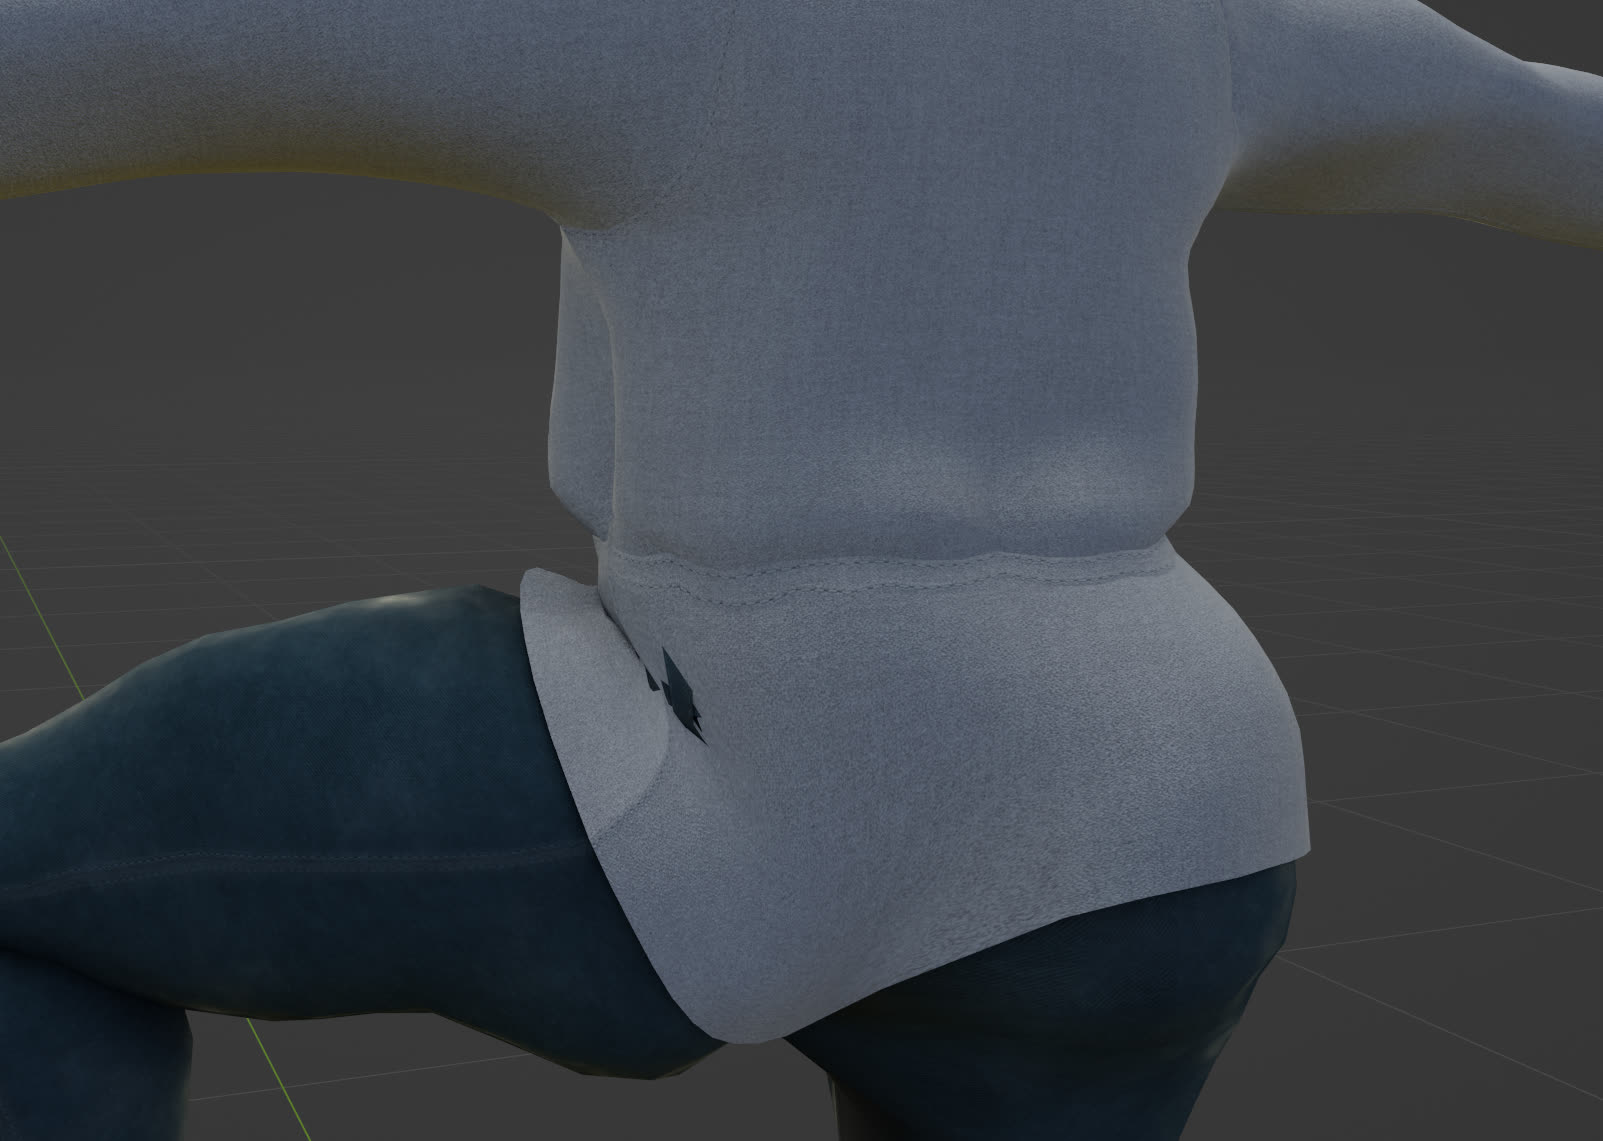
After you are satisfied with how it looks, run through the poses again with the blend shapes turned to 1 to check that it works well and doesn’t clip through the body or other clothes. Make necesary edits to make sure it works well. Repeat these steps for all the blend shapes.
If the clothing piece doesn’t necessarily need blend shapes for breasts (pants or male version of the clothes piece) you still need to create the blend shapes, but you can leave them unedited, they just need to exist on the model. When you are done with the blend shapes and you have tested them, you can export the model to fbx. Make sure to select the model, as well as the skeleton it is connected to (skeleton of the avatar).
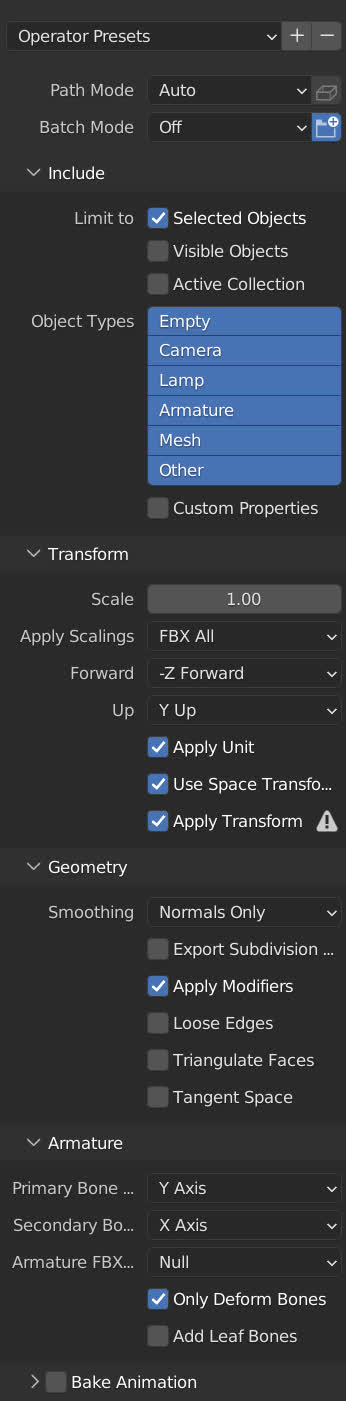
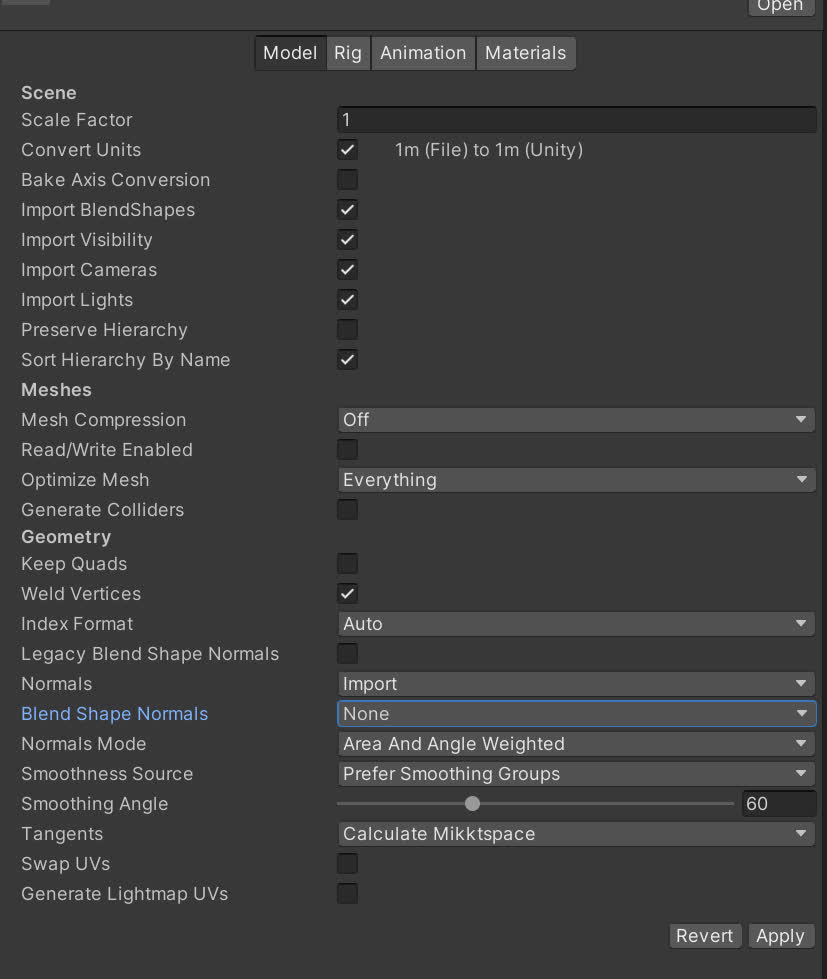
You can now import the fbx into Unity. Set “Blend Shape Normals” to “None”.
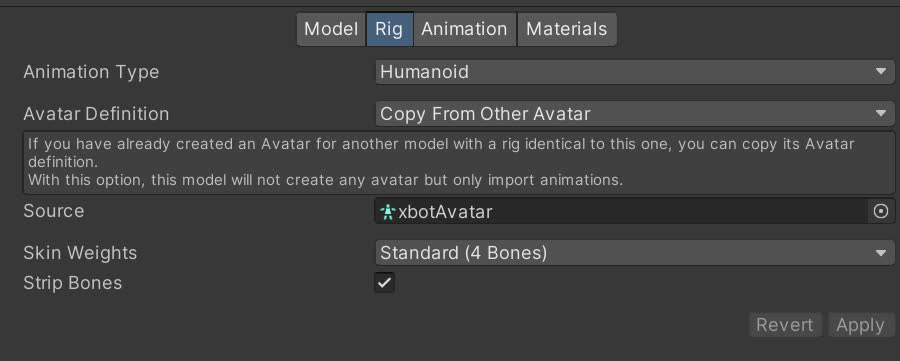
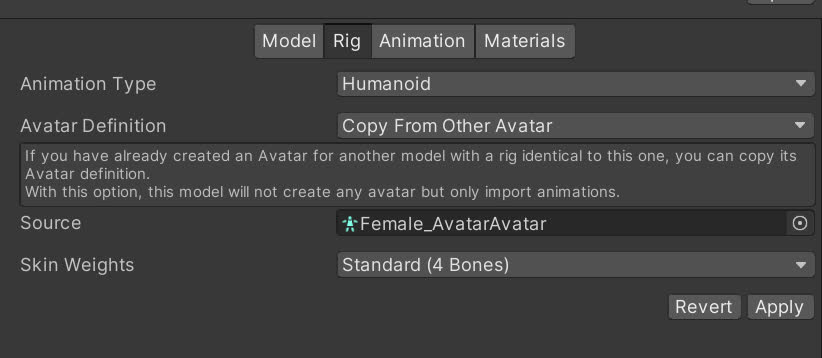
Rig has to be set to humanoid and the Avatar Definition needs to be set to “Copy From Other Avatar” then in the source choose male or female Avatar.
Disable “Import Animation”.

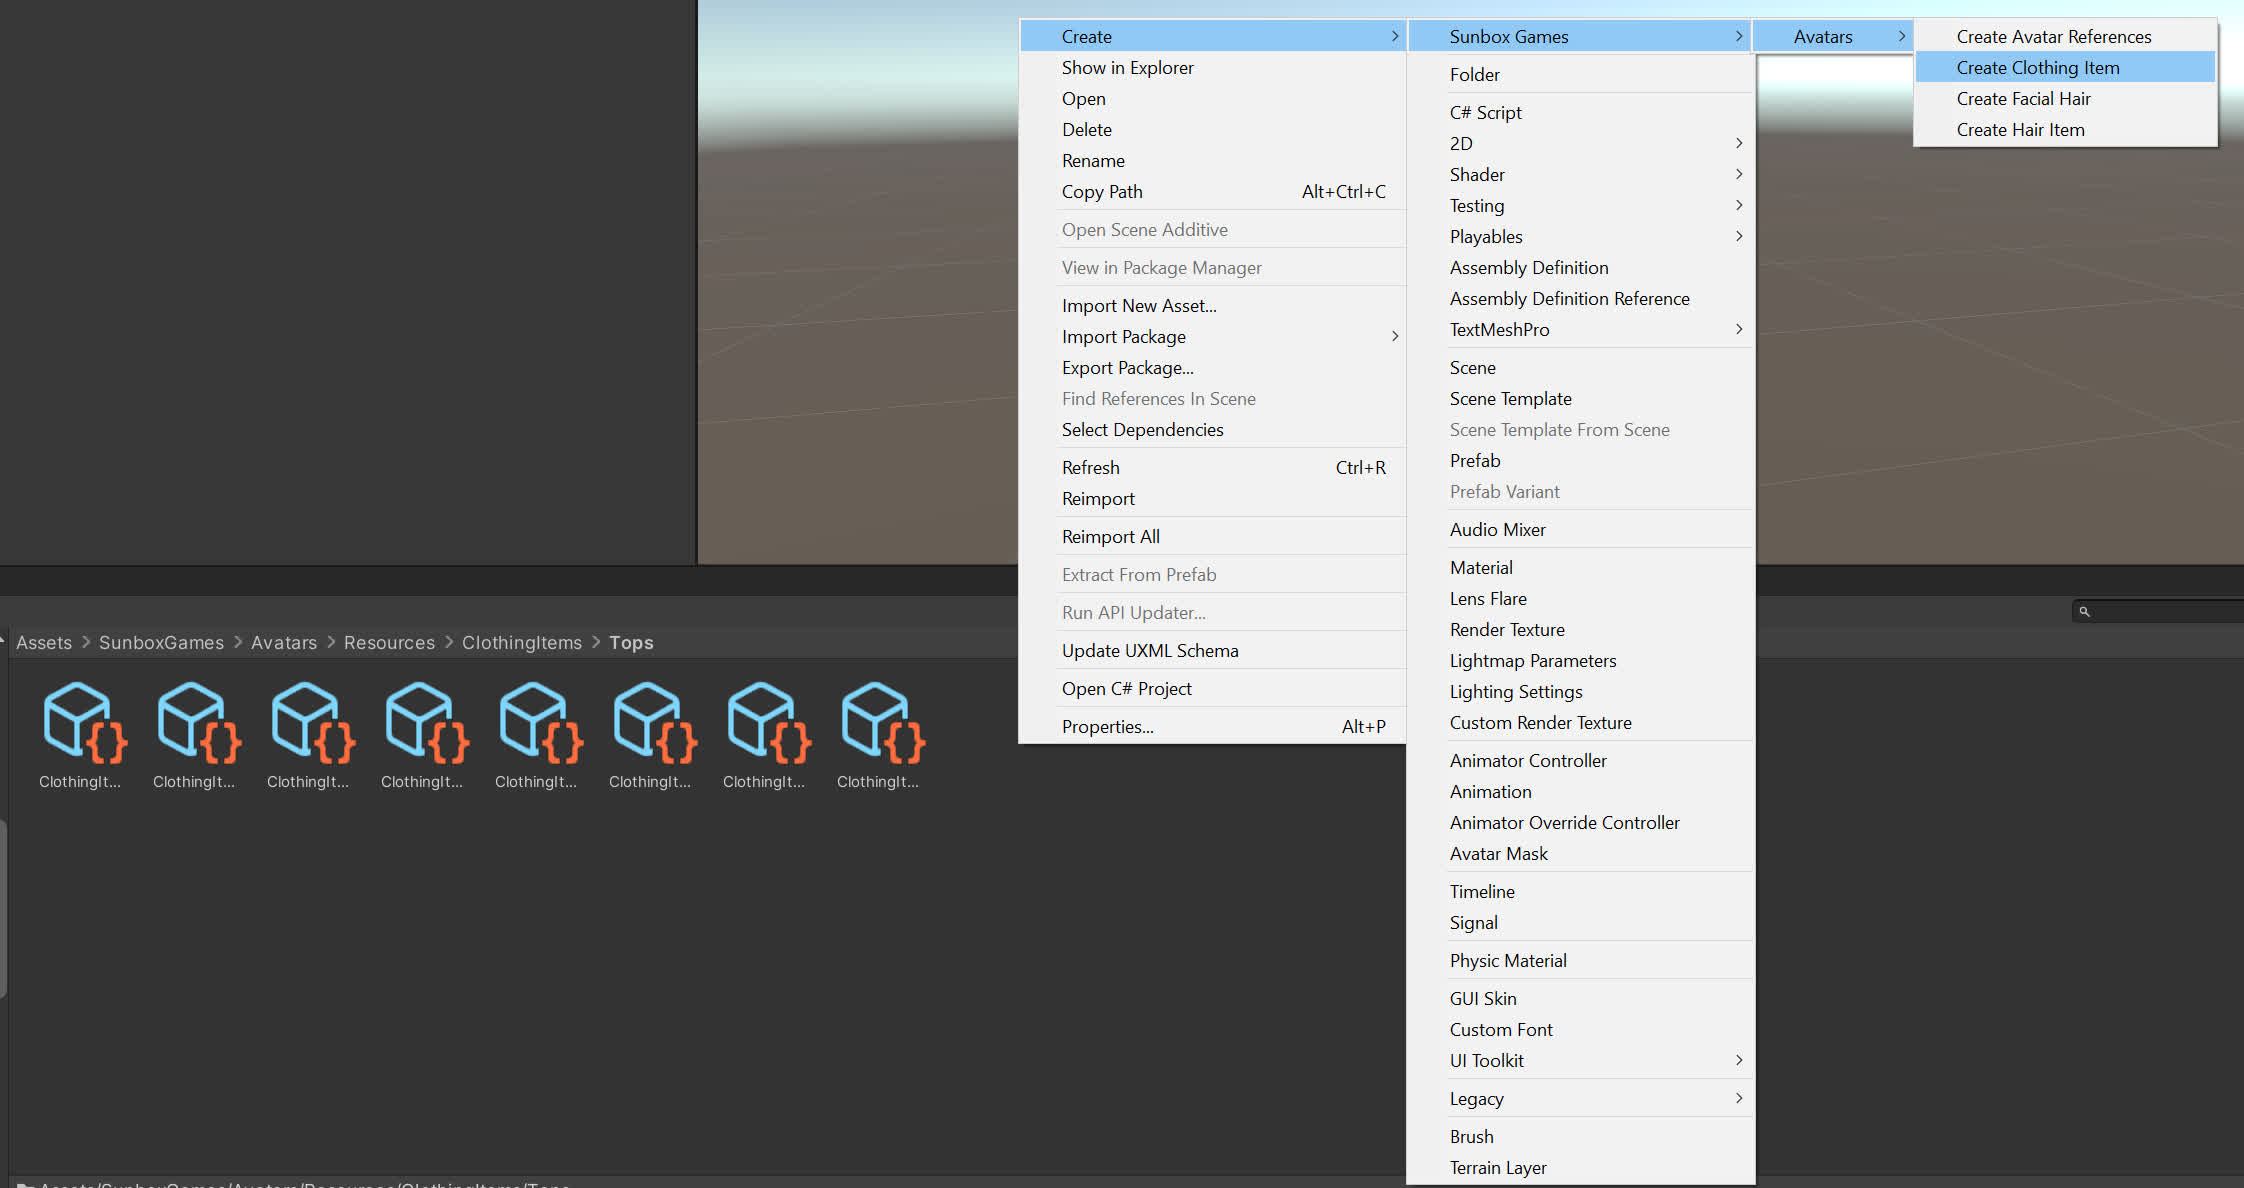
To create a new Clothing Item Right click in the correct clothing items subfolder and navigate to Create→Sunbox Games→Avatars→Create Clothing Item.
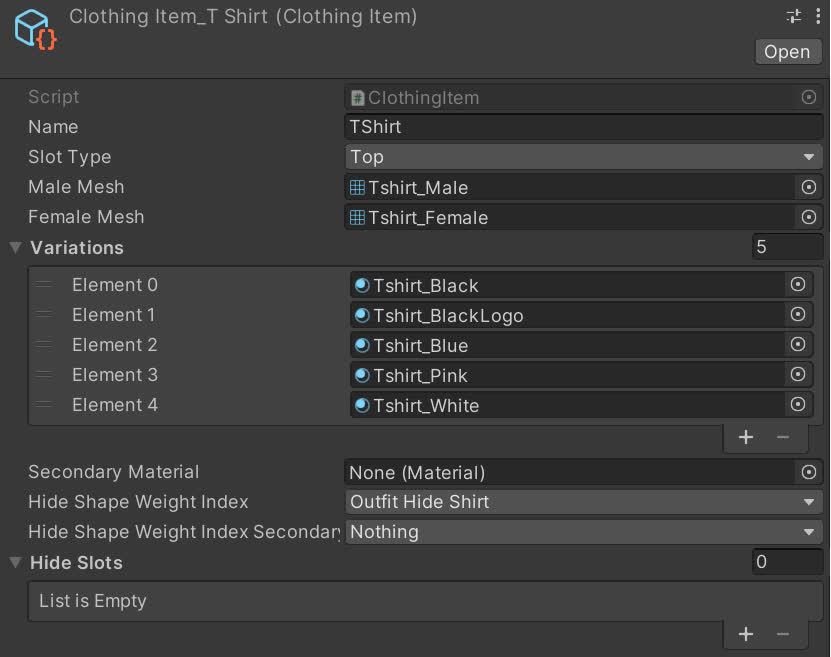
Select the item and in inspector set up the new item. Name your new clothing item and select the slot it occupies. Find or drag in the skinned mesh renderers of the male and female version of the mesh and all the versions of the material. If you require an additional material slot that doesn’t change, you can make sure that it’s the second slot and set it in Secondary material.
You can select from a list of hide shapes, that shrink parts of the body mesh that prevents clipping. you can use 2 shapes that add to each other. If your specific clothing item requires it, you can also prevent other slots from spawning, you can enable that by adding them to the “Hide Slots” array.
In the end make sure to add the new Clothing Item to the array of available clothing items in the references. references are found in Assets/SunboxGames/Avatars/Resources/AvatarReferences.asset
You can use the editor and locomotion scene to test your new clothing item with existing items, body shapes and in animation and make additional tweaks if necessary.
11.2. Parent To Bone Clothes
Some clothing items that don’t need to deform with the skeleton and are just parented to the bone (e.g. Glasses and hats). For these just make sure that their origin is at the same place as the bone they are parented to (”Head” bone in the case of glasses and hats). The same goes for custom hair meshes, but in the case of those also make sure they don’t interfere with facial blend shapes.
12.0. Support
Please write us to [email protected] for any additional information or support.
Made with ❤️and lots of ☕.